
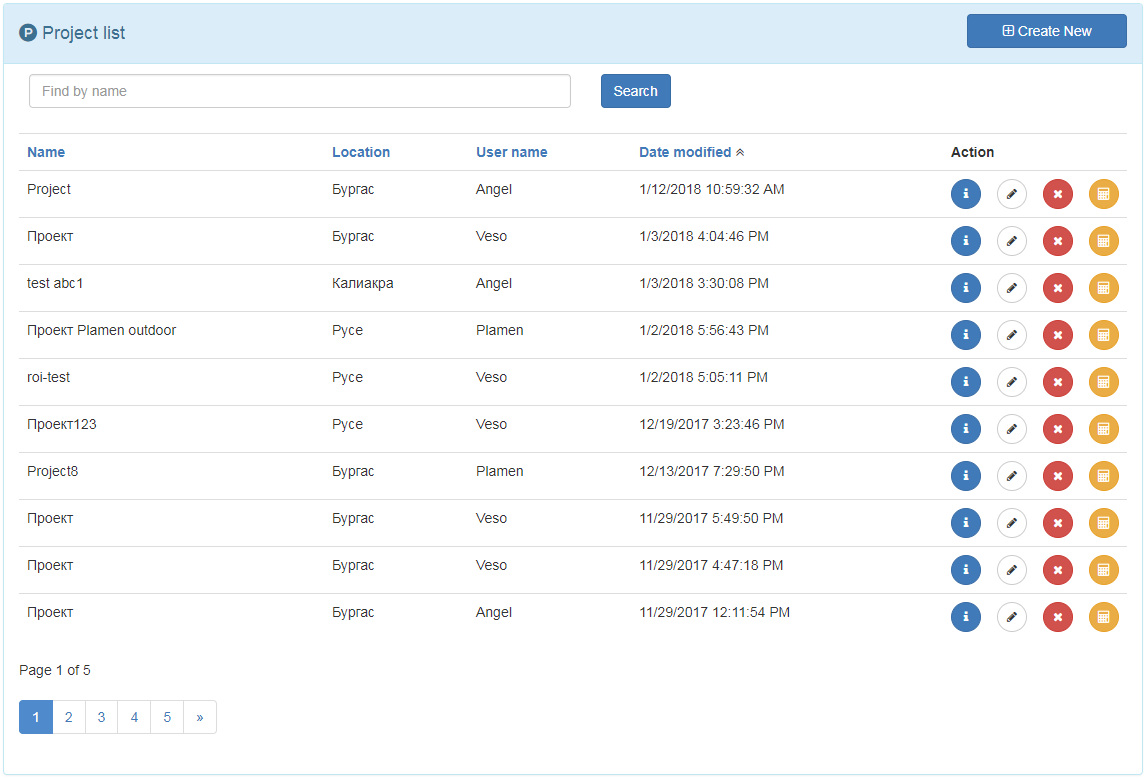
When you press the "Projects" button in the main menu of the website a list of your projects appears, if you have ones. In columns you can see the name of the project, location, the user name of the creator and the date modified. In the "Action" column there are four buttons. The first three are: Information, Edit and Delete. The forth one is to show the report. You can sort the contents of the list of projects by clicking on the "Name", "Location", "User name" and "Data modified".
To create a project press "Create New" button which is in the top right part of the list of projects:

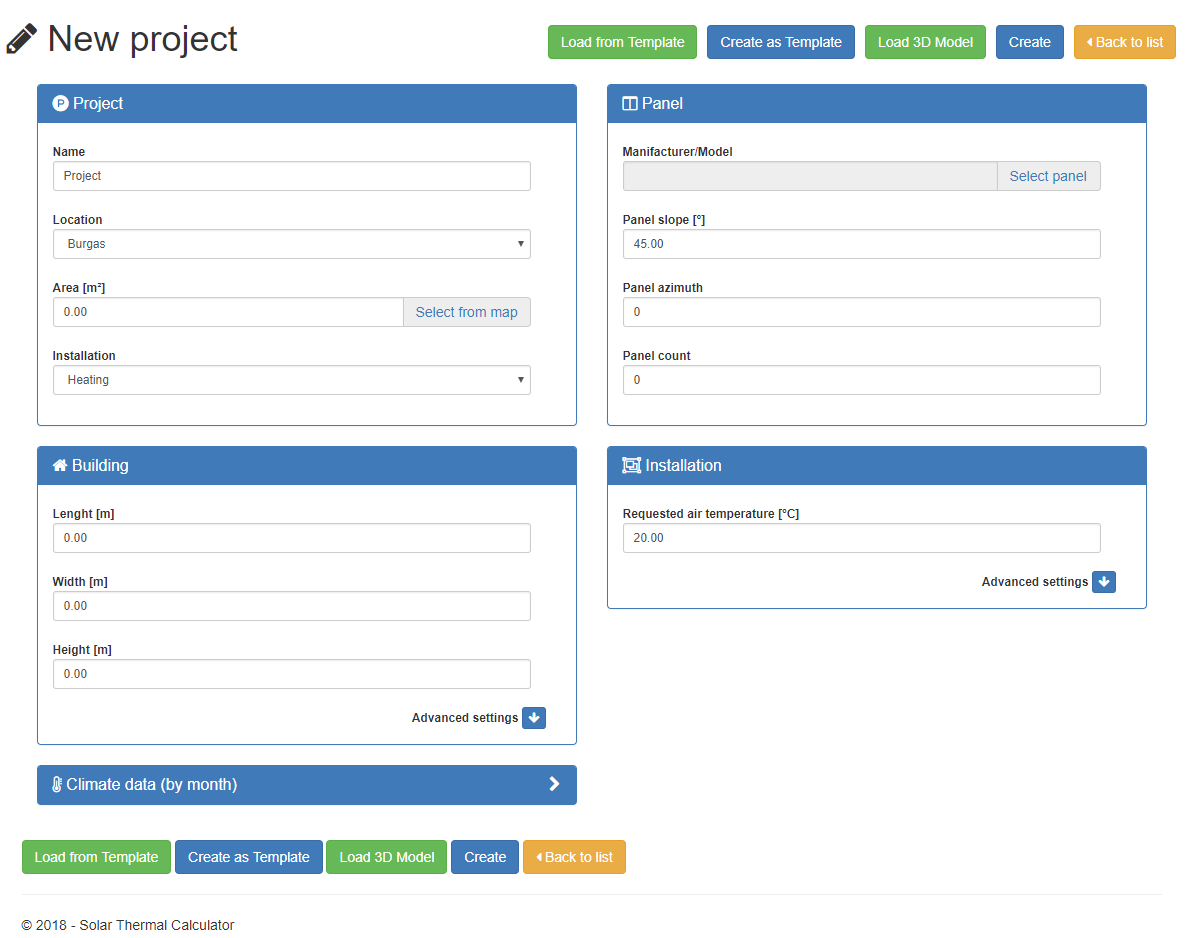
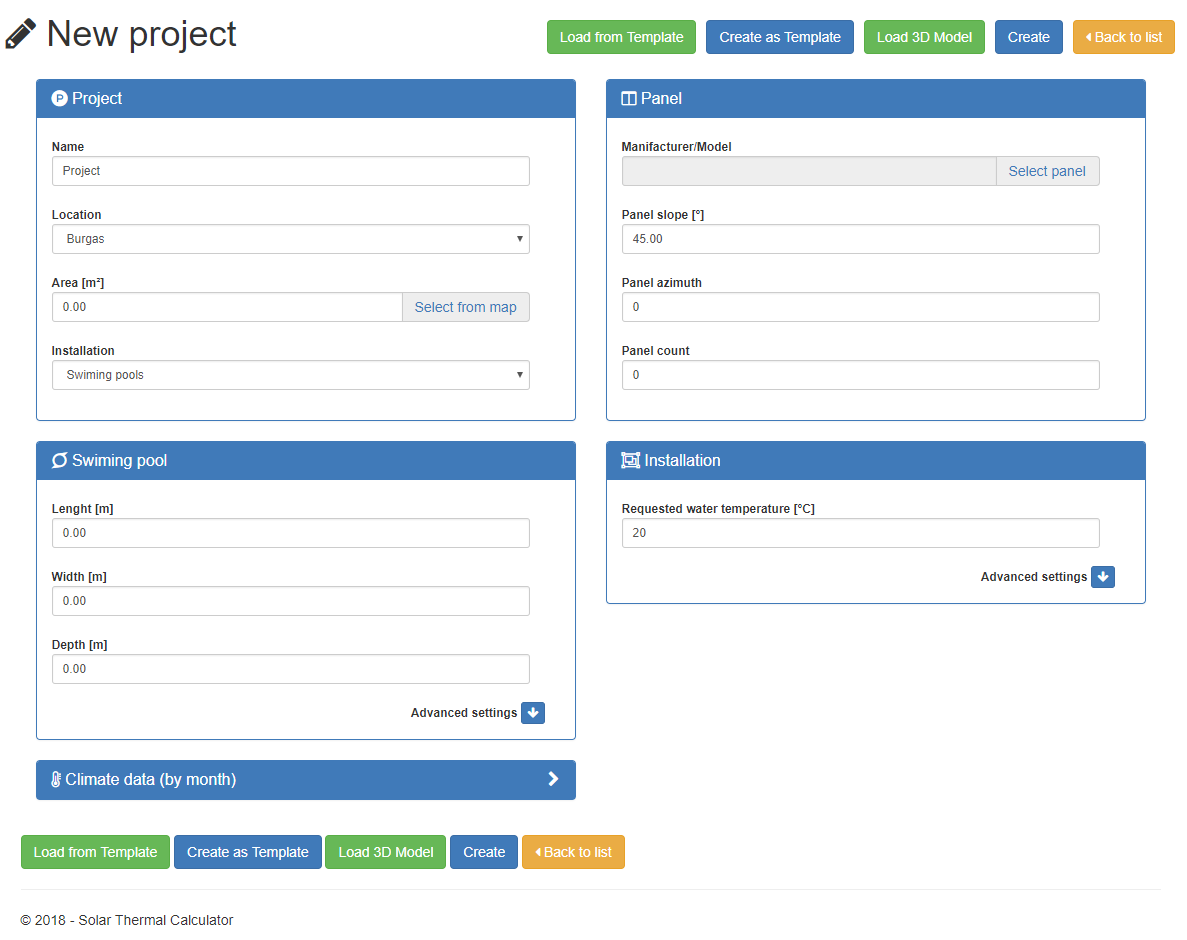
"Create project" form will show. By default the project type is "Domestic hot water" (See Project types)
To get information about the project press the "Information" button in the "Action" column which is on the row of the chosen project.

A window will appear, listing the characteristics of the selected project:
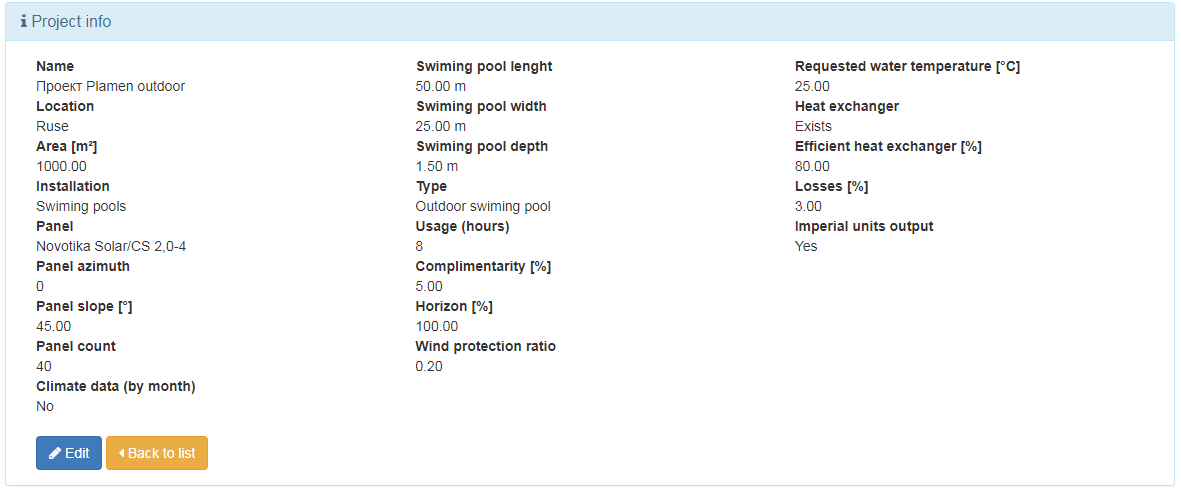
You have the option to edit the project ("Edit" button) or return to the list ("Back to list" button)
To find a project, type the name of the project or part of the name of the project and click on the "Find" button. The list of the projects corresponding to the search appears.

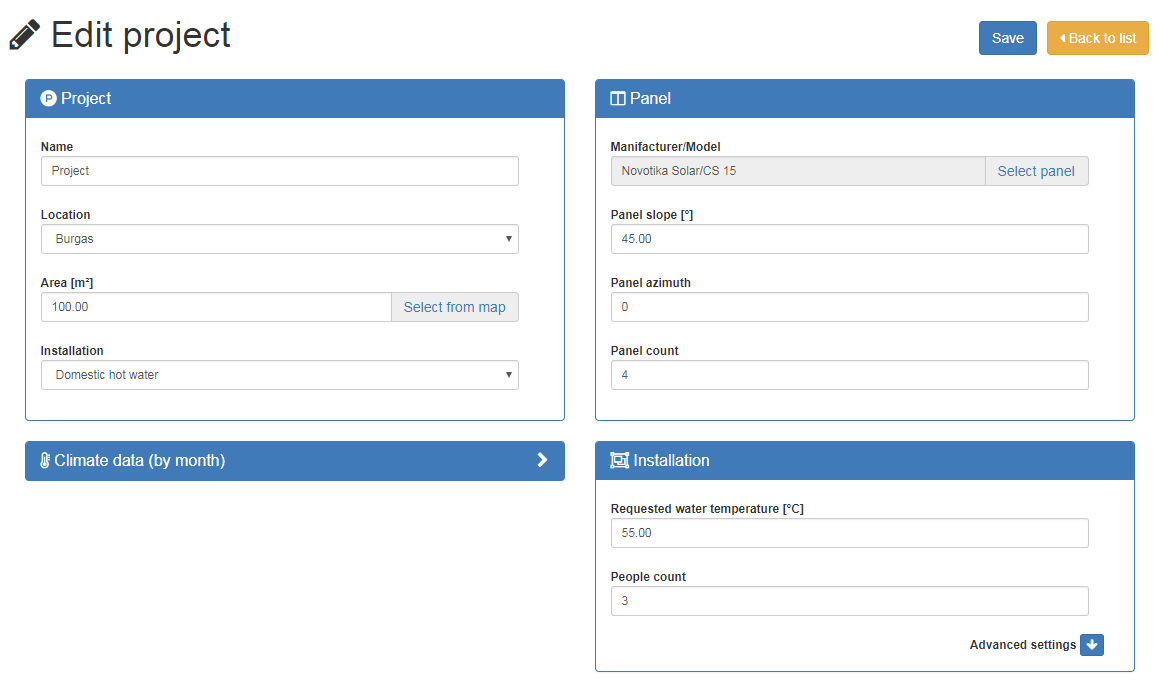
Click the "Edit" button in the "Action" column in the row of the selected project.

An edit form opens in which you can change the features of the project. When finished, click on the "Save" button. You can cancel the changes using the "Back to list" button
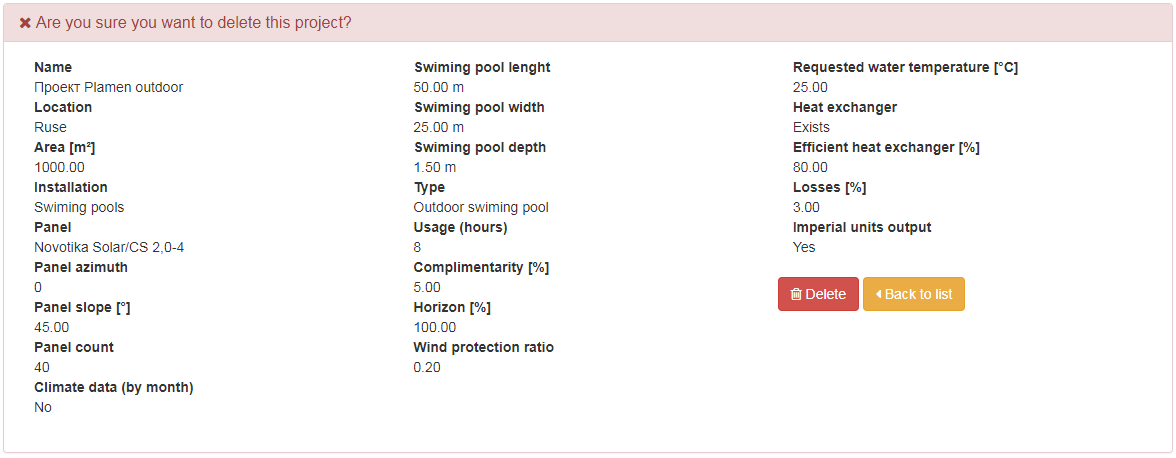
To delete the project, click on the "Delete" button in the "Action" column in the row of the selected project.

A form in which you can explore the features of the project will open. If you really want to delete it, click on the "Delete" button. If you want to cancel, click the "Back to list"
The types of projects are divided according to the installation you choose: Domestic Hot Water, Heating, Swimming Poolsand Mixed(Domestic Hot Water + ).
The form for creating a project "Domestic hot water" shows the following fields, which must be filled in:
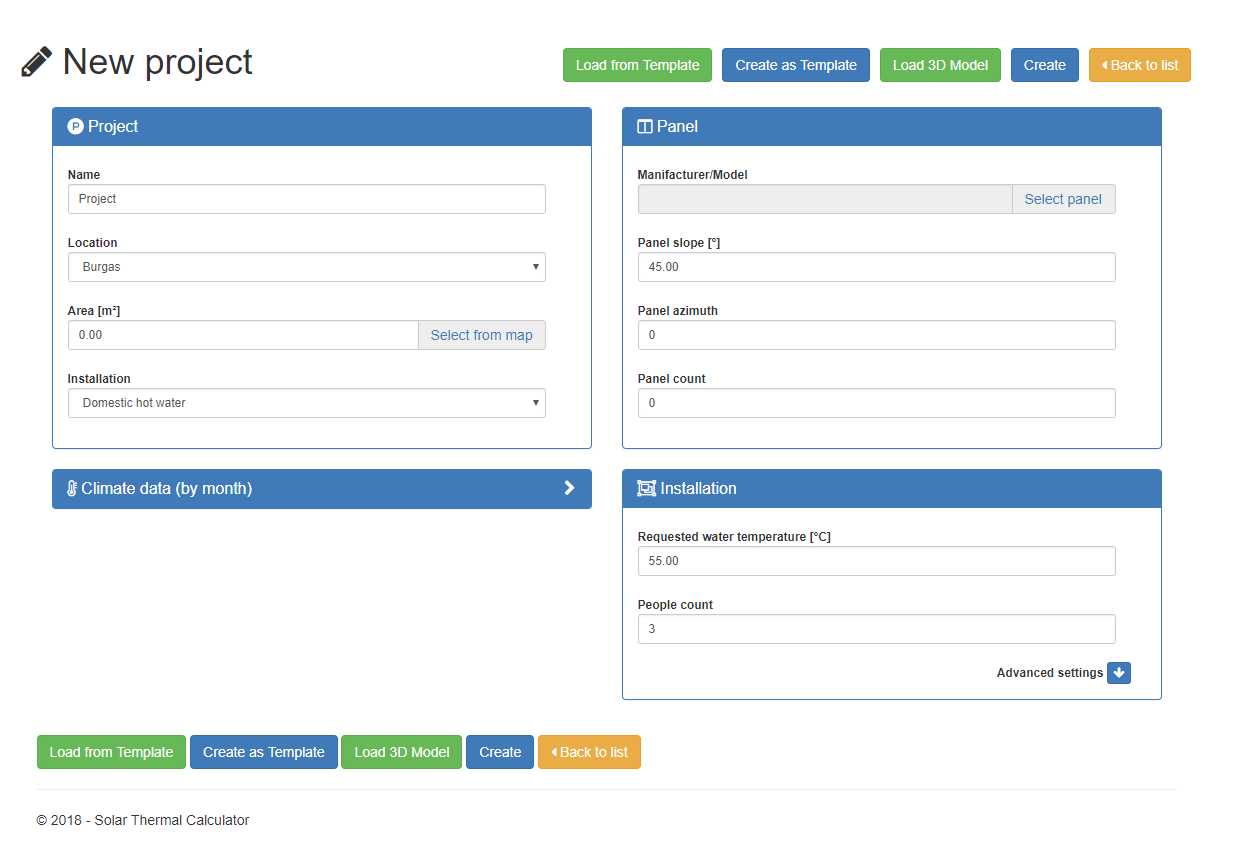
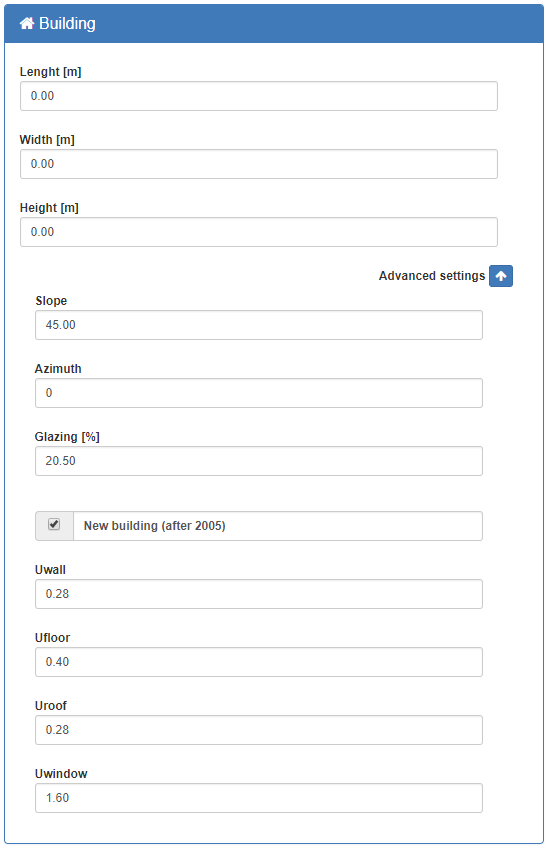
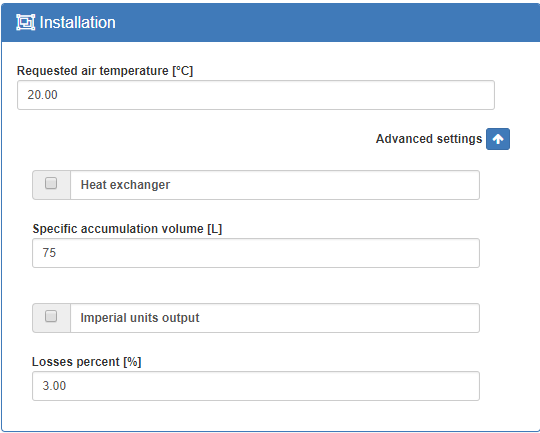
In this window you can change the characteristics of different elements of the installation, as listed below:
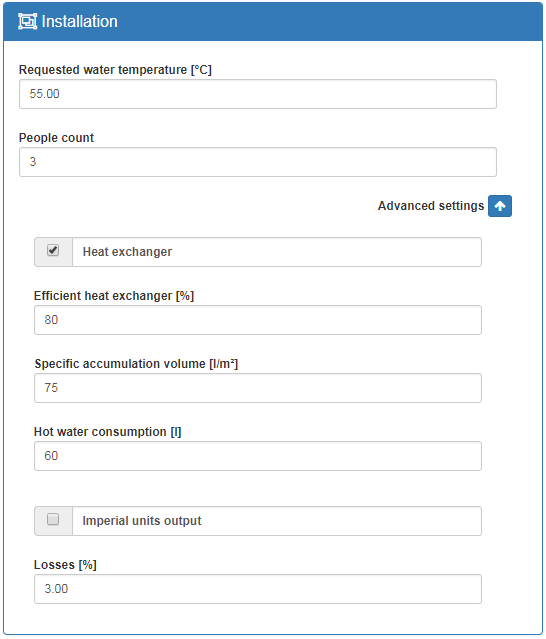
Clicking on the "Climate data (by month)" link displays the following window, fully expanding it by clicking on the "Daily Solar Radiation Data" and "Average Monthly Temperature" checkboxes. The user could add private climate data in the fields:
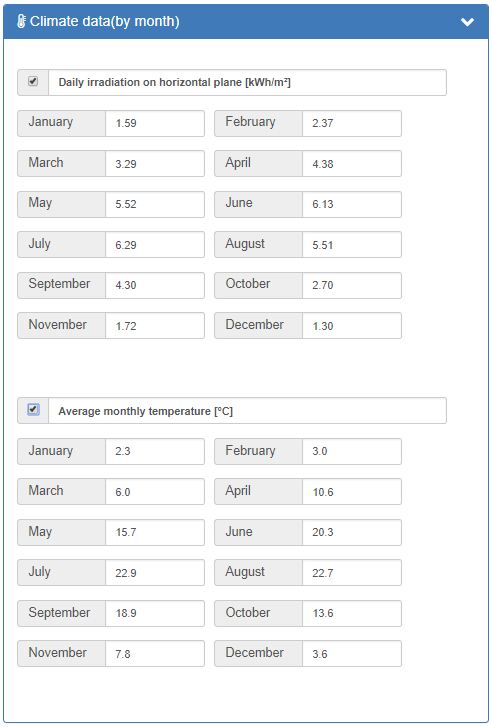
Here are the daily solar radiation data and average temperatures for the region by months. If desire, you can make a change.
The 3D model loading dialog is started after clicking on the "Load 3D model" button. Initially, the dialog contains only the file selection, closing, and import buttons. Loading an object starts after selecting a PLY (3D) file. Data from the loaded 3D model can be applied to the project after pressing the Import button.
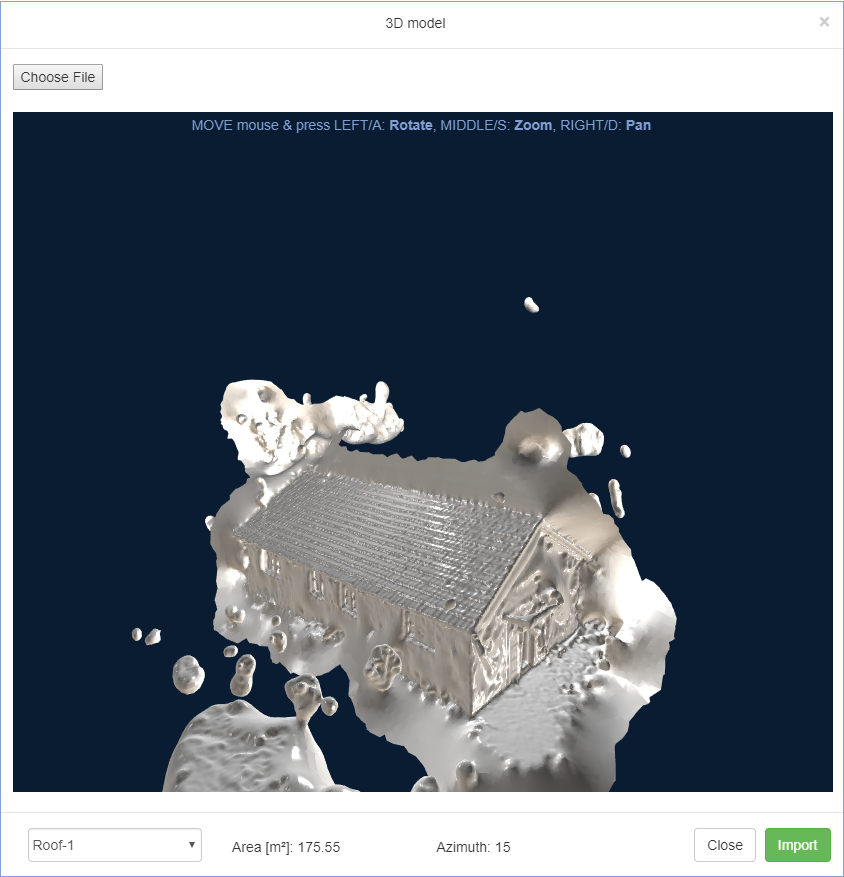
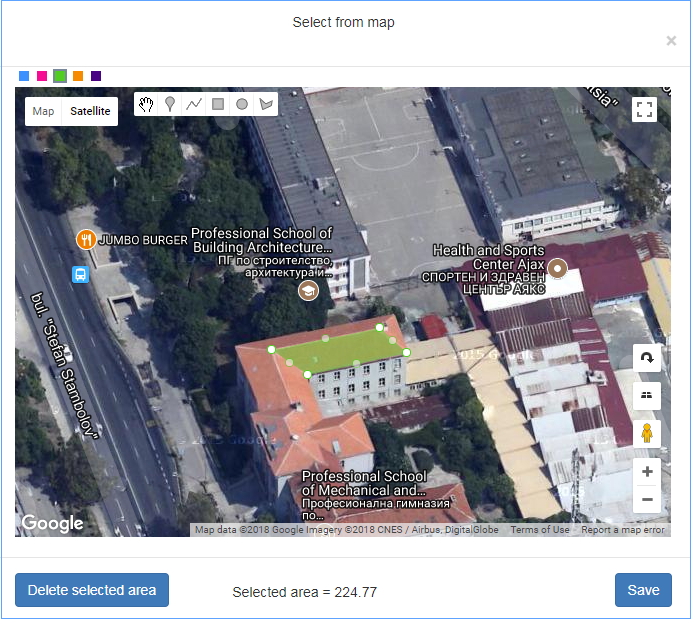
The web system automatically recognizes the roofs and facades of the model stored in a separate section in the 3D model file. They can be selected from the drop-down list, after which the area and azimuth of the selected item are displayed in the fields next to the list.
When choosing a heating installation type, the following mandatory fields are filled in:
The parameters of "Installation" and "Panel" are filled in the same way as for the project "Domestic Hot Water" (See Installation and Panel)
The installation values are similar to those for domestic hot water.
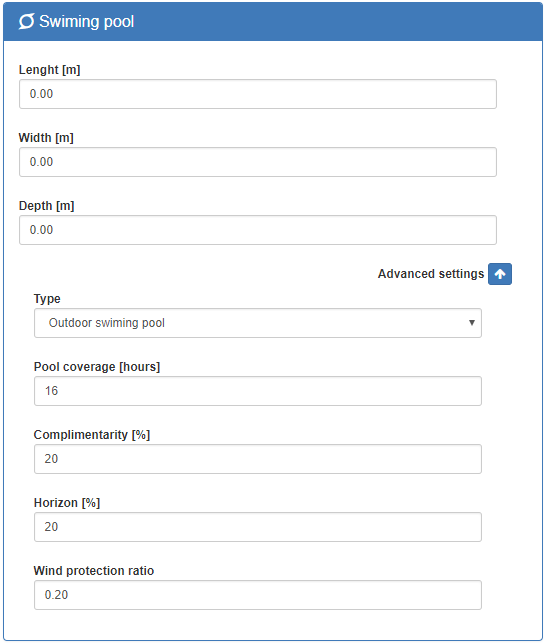
When selecting the type of installation "Swimming pools", the following mandatory fields are filled in:
The parameters of "Installation" and "Panel" are filled in the same way as for the project "Domestic Hot Water "(See Installation and Panel)
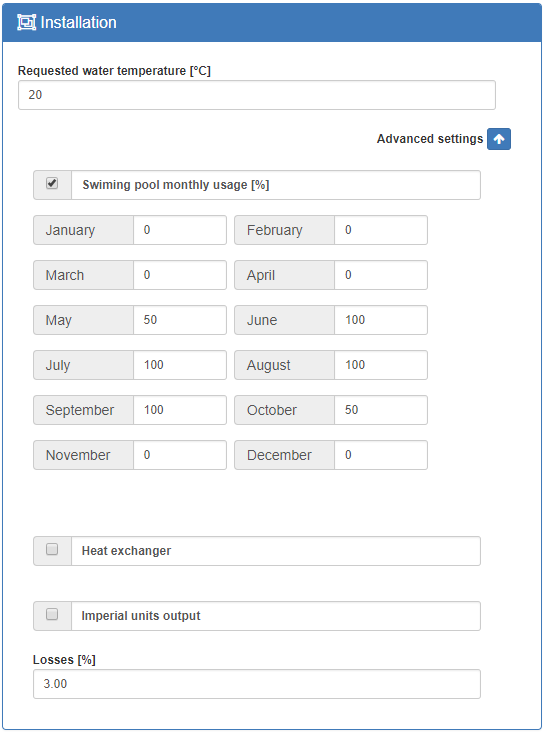
The values for the required water temperature, heat exchanger, output in imperial units and the percentage of losses are similar to those for domestic hot water. If you click the "Swimming pool monthly usage" button you can enter how many percent of each month of the year the pool is used.
The mixed installation consists of the components of the heating and domestic hot water systems
To get a project report, click the "Report" button in the "Action" column of the selected project row.

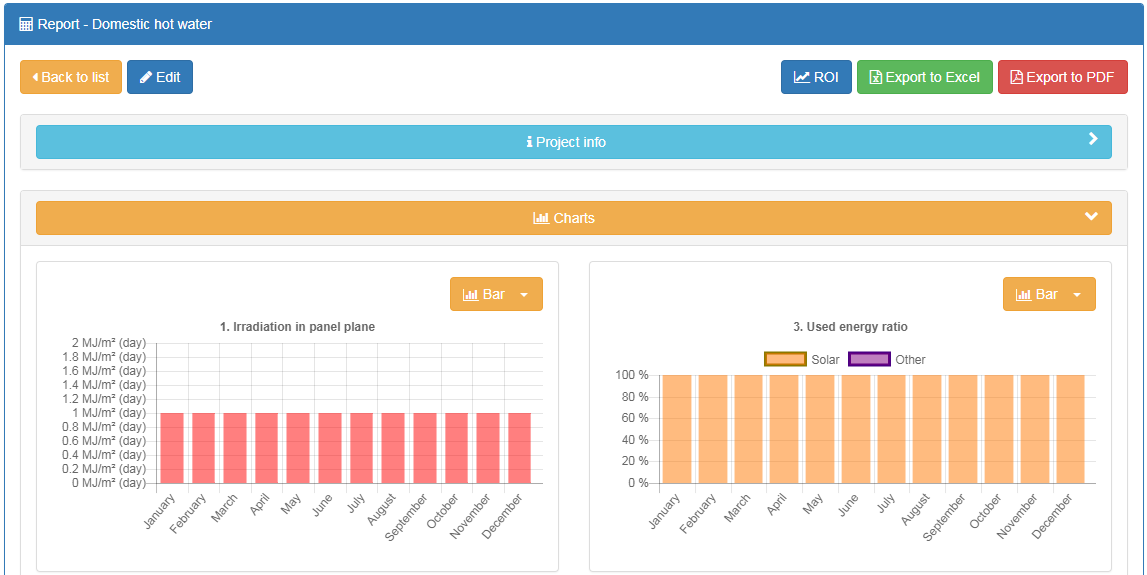
The report generated based on the selected project is displayed:
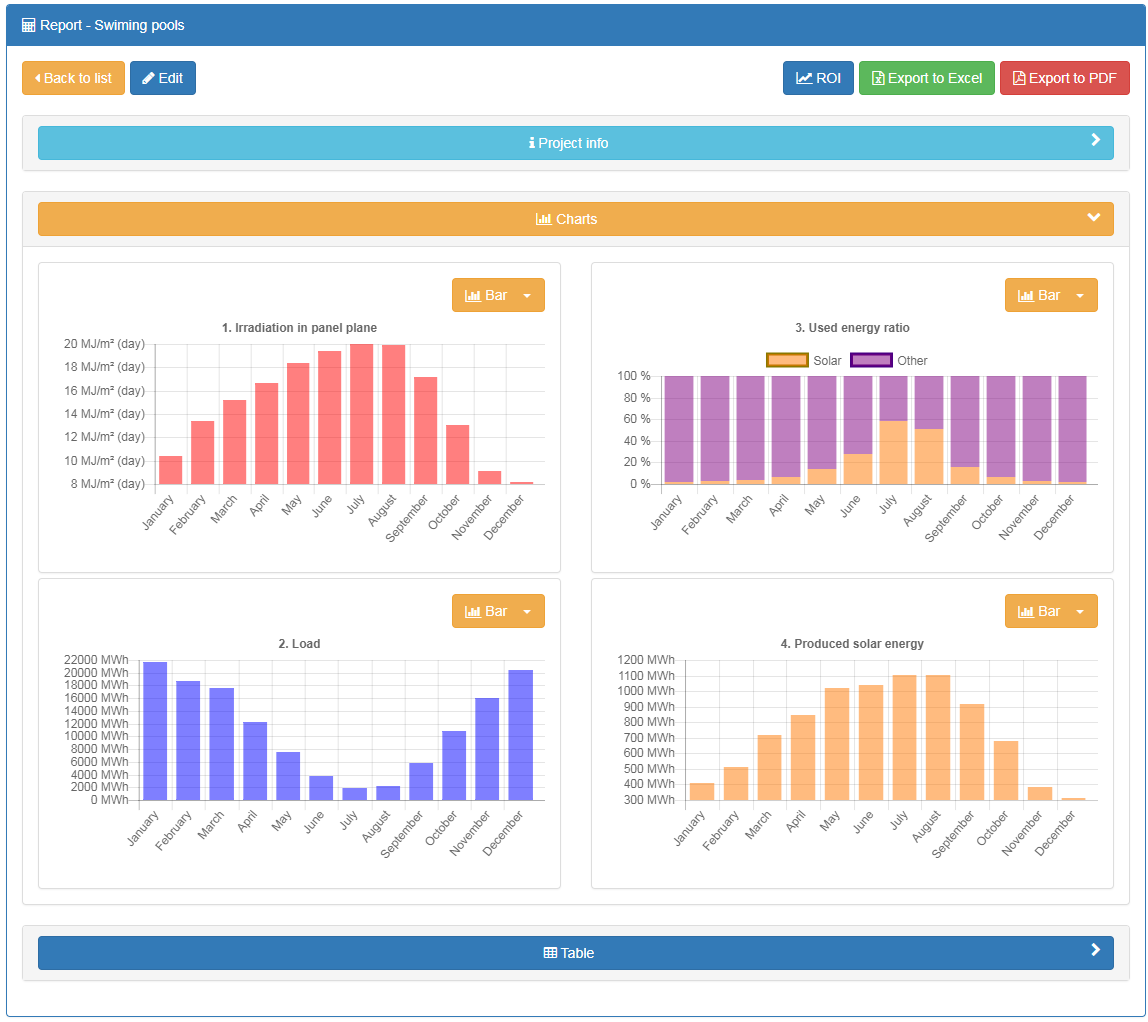
The report contains 4 diagrams:
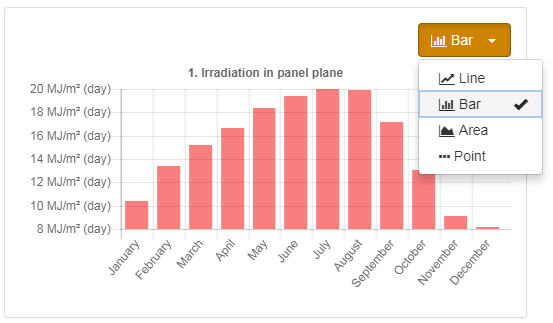
You can select a chart type using the drop-down list at the top right:
Reports can be exported to Excel (XLS) and PDF.

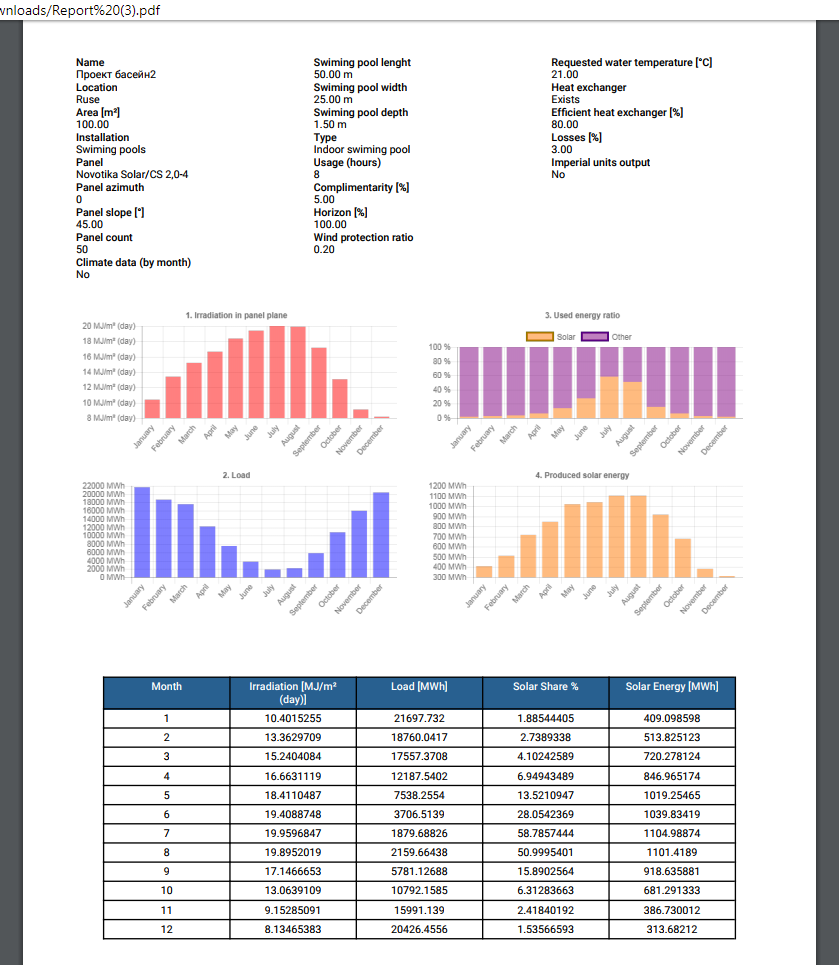
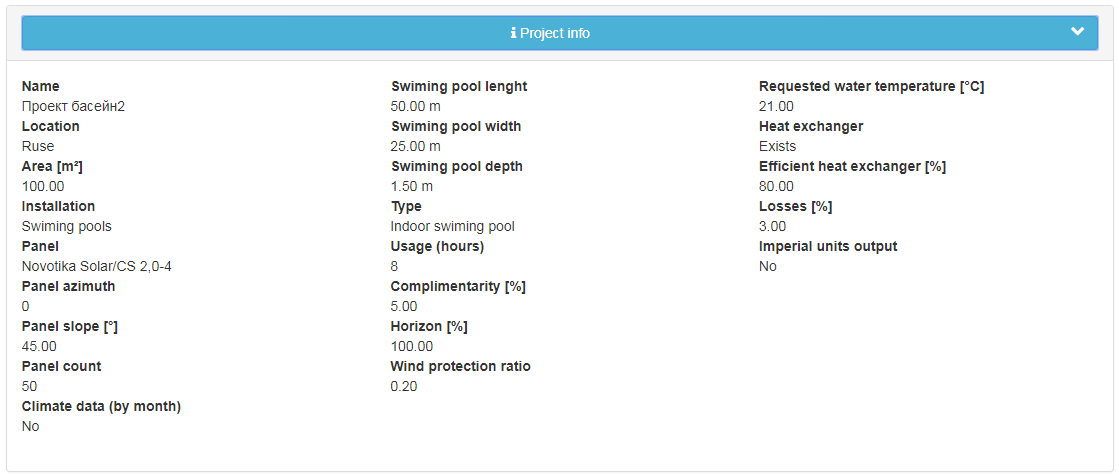
If you click on "Project Info", the details of the analyzed project will be expanded:
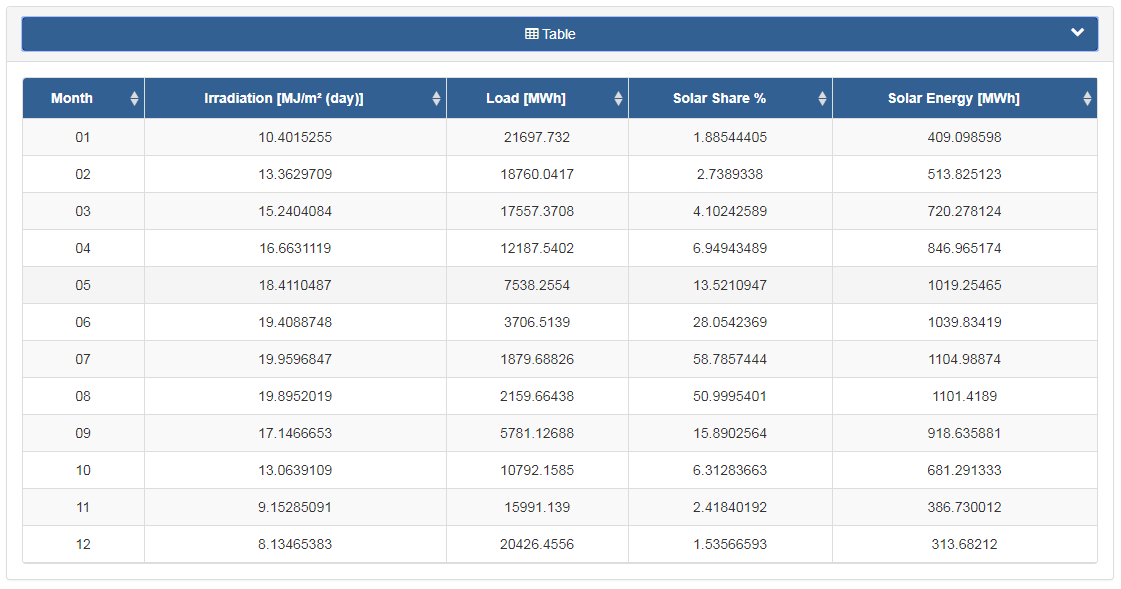
If you click on "Table," the report data will appear in tabular form:
Initiating the techno-economic analysis is done by clicking the "Analysis" button on the Report page for the current project.
At start-up, the techno-economic analysis looks like this:
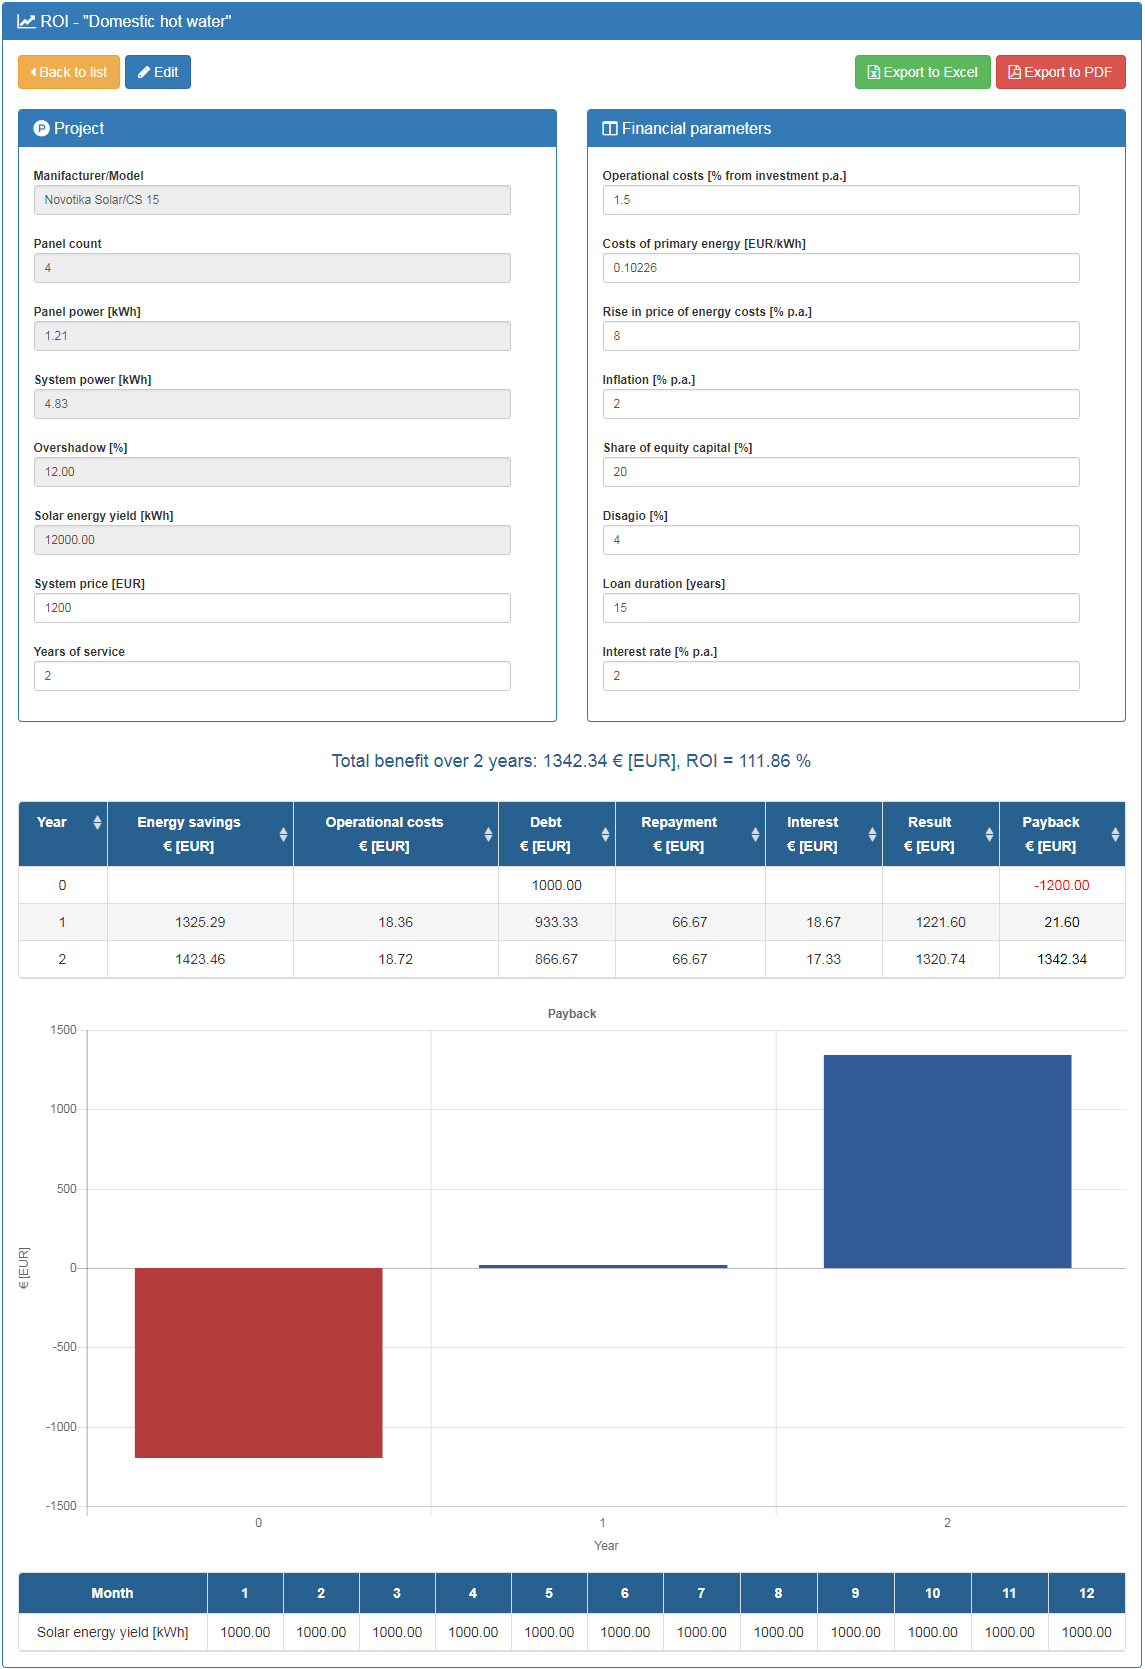
The "Project" and "Financial Parameters" panels are located at the top of the page. The results shown in the tables and chart on the Analysis page are based on the parameters in these two panels:
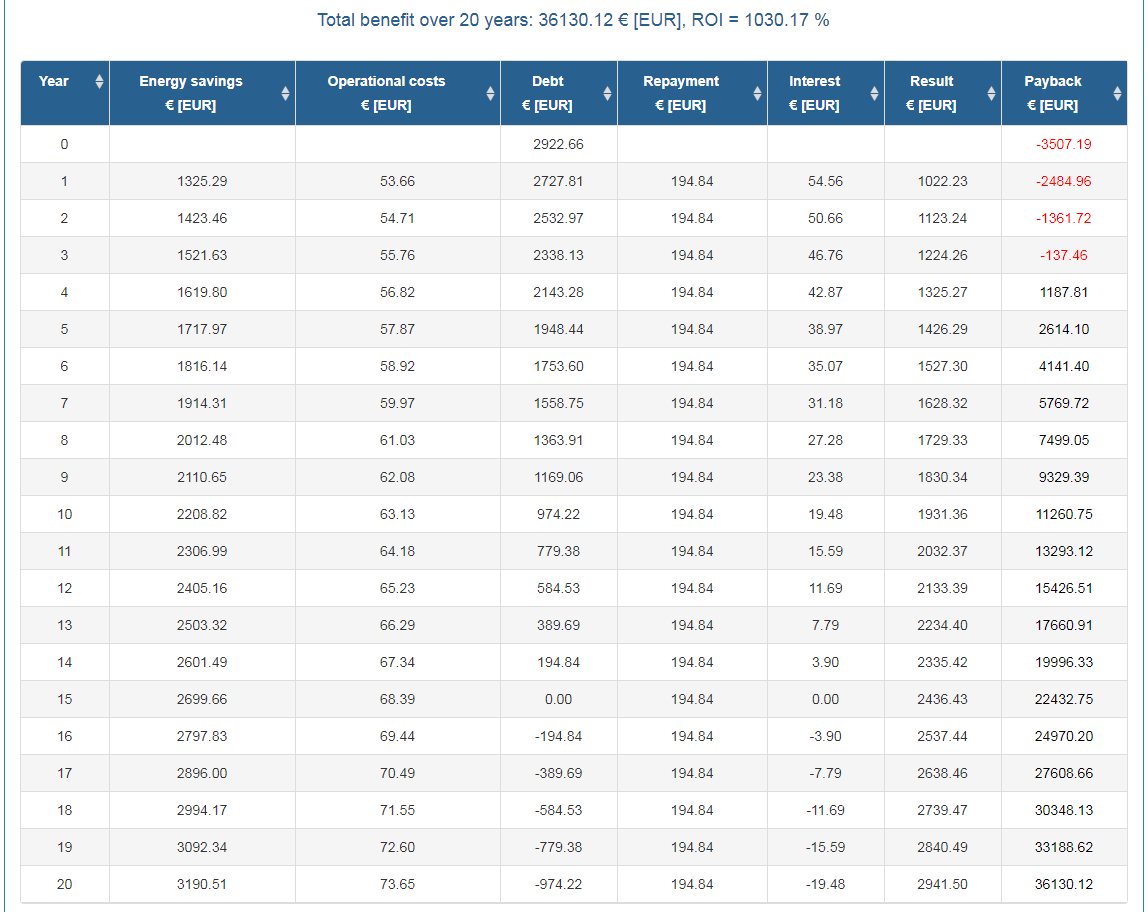
The table at the middle of the page shows the return on investment by years. The values in the table change after each change of parameters from the "Project" and "Financial parameters" panels.
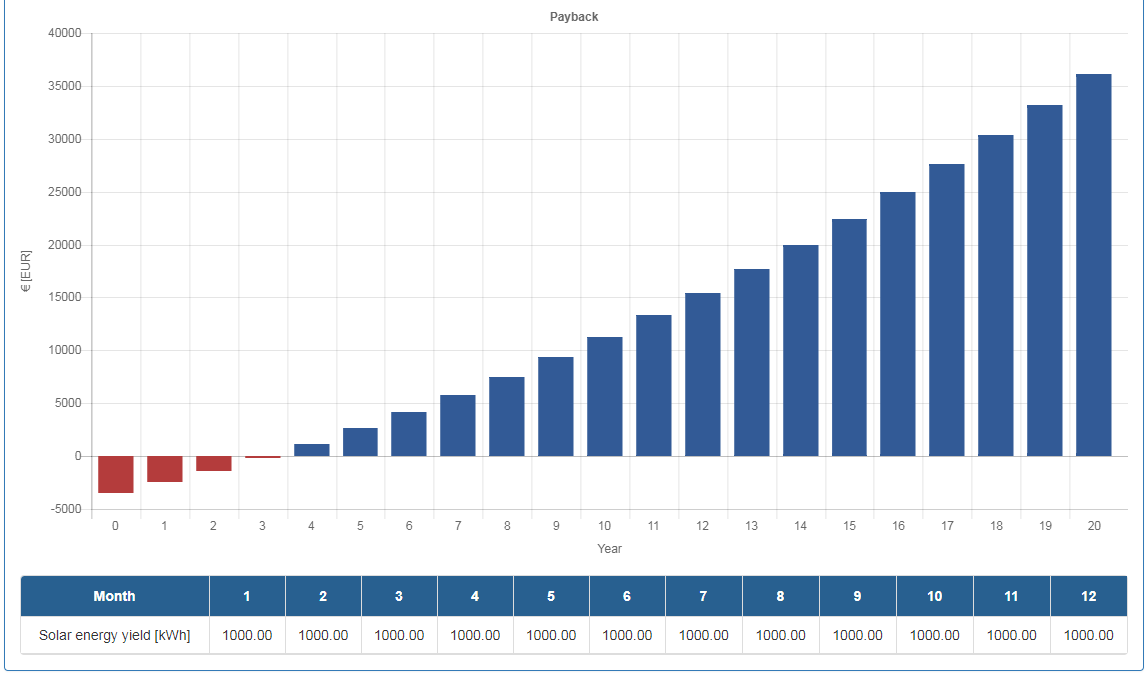
At the bottom of the page is a chart showing the return on investment by years and the table of monthly energy produced by the installation.
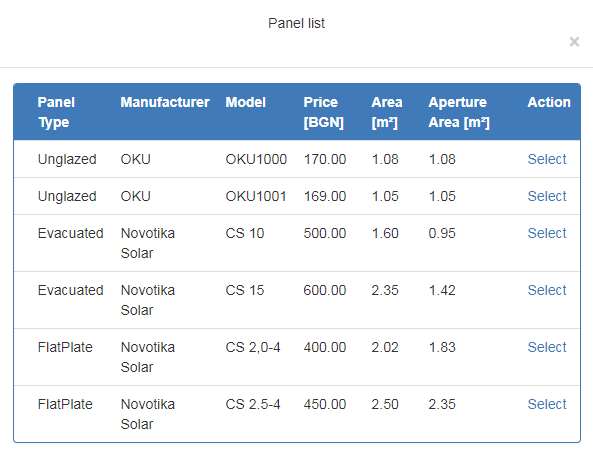
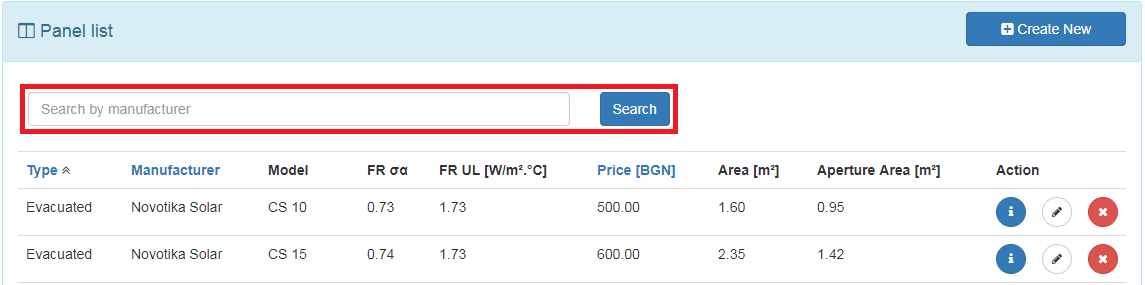
"Panels" button is available in the main menu of the website only for users having rights for that. When you click the "Panels" button in the site's main menu, a list of panels is displayed. Columns show the type of panel, producer, model, coefficient FR TA, coefficient FR UL, its price in BGN, area in square meters, aperture area in square meters. There are three buttons in the Actions column. They are used for information, editing and deletion of the panel. You can sort the contents of the list of panels by clicking on the "Type", "Manufacturer" and "Price".

To add a panel, click the "Create New" button at the top right of the panel list:

A form will open to create a new panel

After entering all the data, click the "Create" button. If you want to cancel creating, click "Back to list"
To get panel information, press the first button in the "Action" column in the row of the selected panel.

A window will open, listing the features of the selected project:
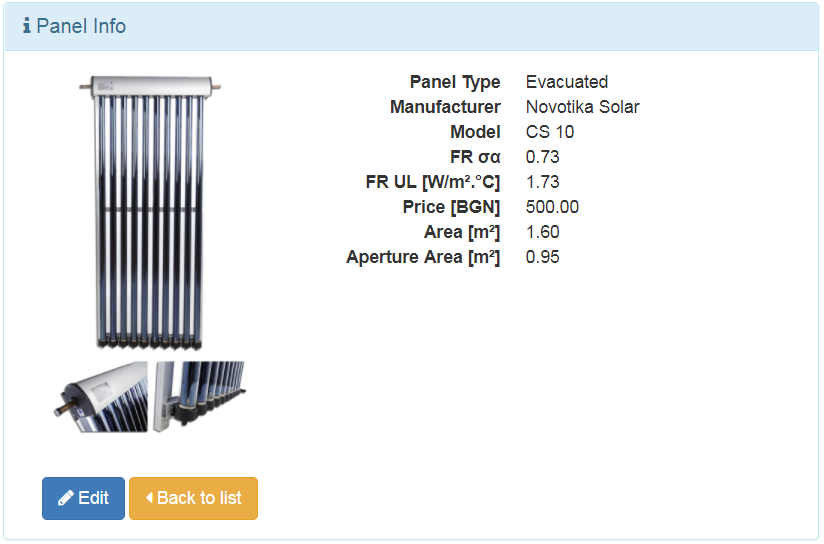
You have the option to edit the panel (Edit button, if applicable) or return to the list (Back to list button)
To find a panel, type the name of the panel or part of the name of the panel and click on the "Find" button. The list of the panel corresponding to the search appears.
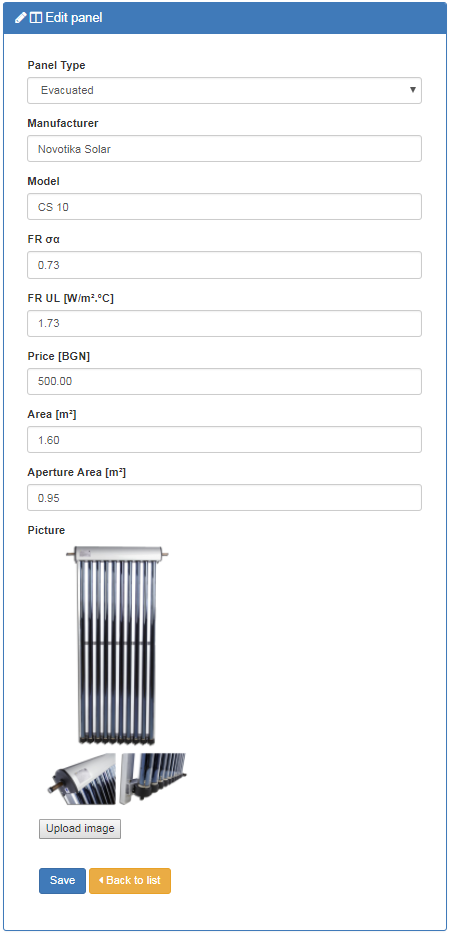
Press the "Edit" in the "Action" column in the row of the selected panel.

An edit form is displayed in which you can change the panel properties. When finished, click on the "Save" button. You can cancel the changes using the "Back to list" button.
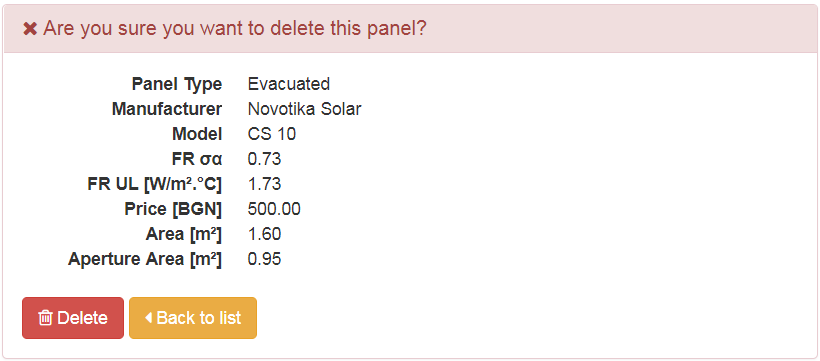
To delete the panel, click the "Delete" button in the "Action" column in the row of the selected panel.

A form is open in which you can view the features of the panel. If you really want to delete it, click on the "Delete" button. If you cancel, click the "Back to list".
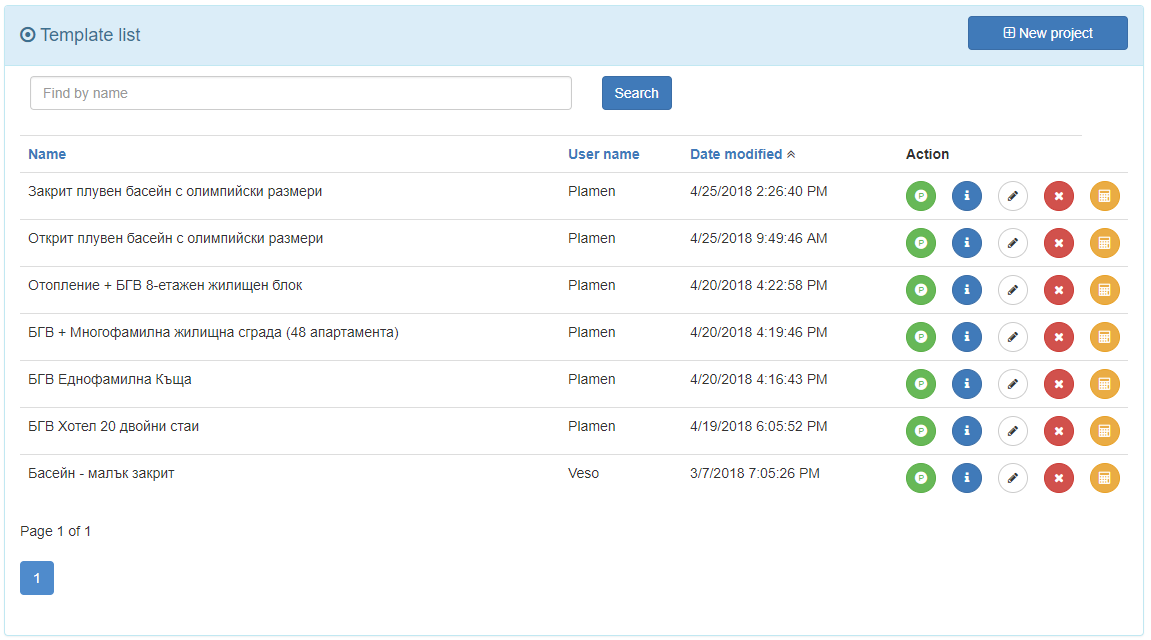
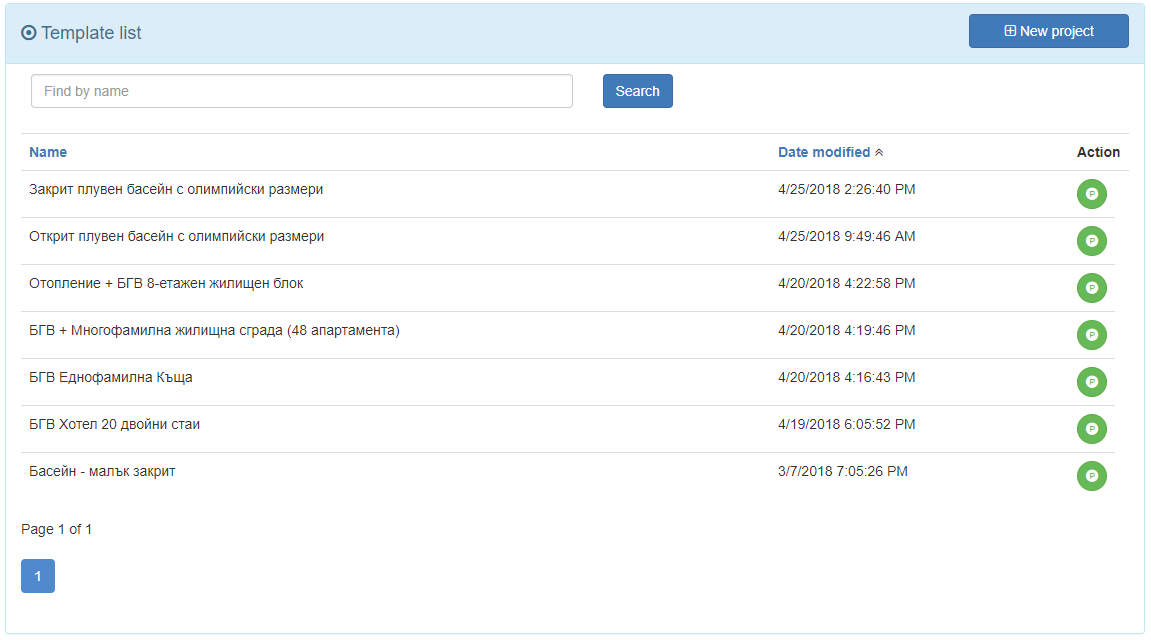
Templates are ready-made projects that a user can use to create a new project to save their efforts in entering project data. Available templates are displayed in a list by clicking on the "Templates" button in the main menu of the site. The columns show the name of the template and the date of the last change. If the user has a Company role, there will be 5 buttons in the Actions column. The first is to create a new project based on the template. The next three are for information, editing and deleting the template. The fifth is to display a report for the chosen template. If the user has a "User" role, there will be 1 button in the Actions column to create a new project based on the corresponding template. The contents of the list of templates can be sorted by pressing the name of the columns "Name" and "Date Modified".
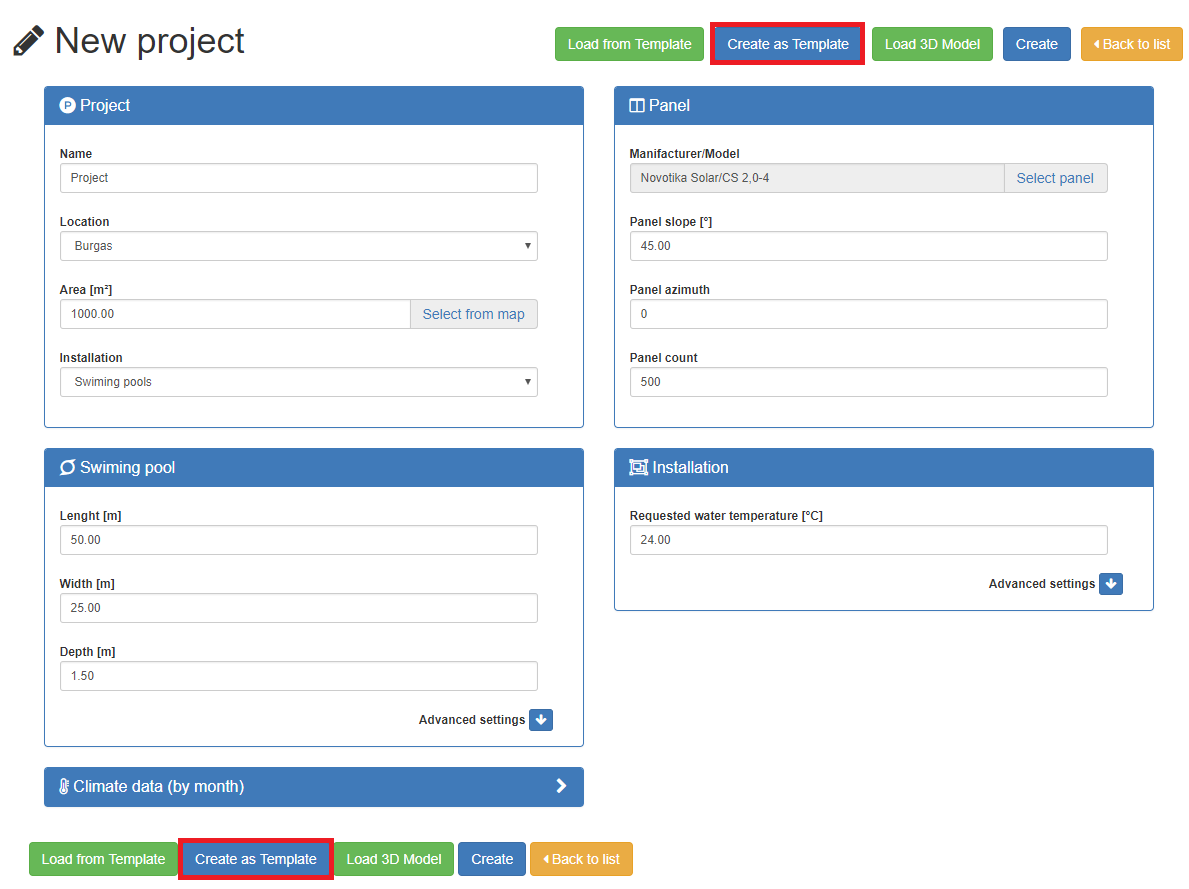
To add a template, the user must have a "Company" role. Click the "New Project" button at the top right of the list of templates:

A form for creating a new project will open. Once you have entered the data for the new project, pressing the Create As Template button will add the project to the list of ready templates. The Create As Template button is visible only to users with Company role.
When we click the "New project from template" button in the list of templates, the new project form will open with the data of the selected template.

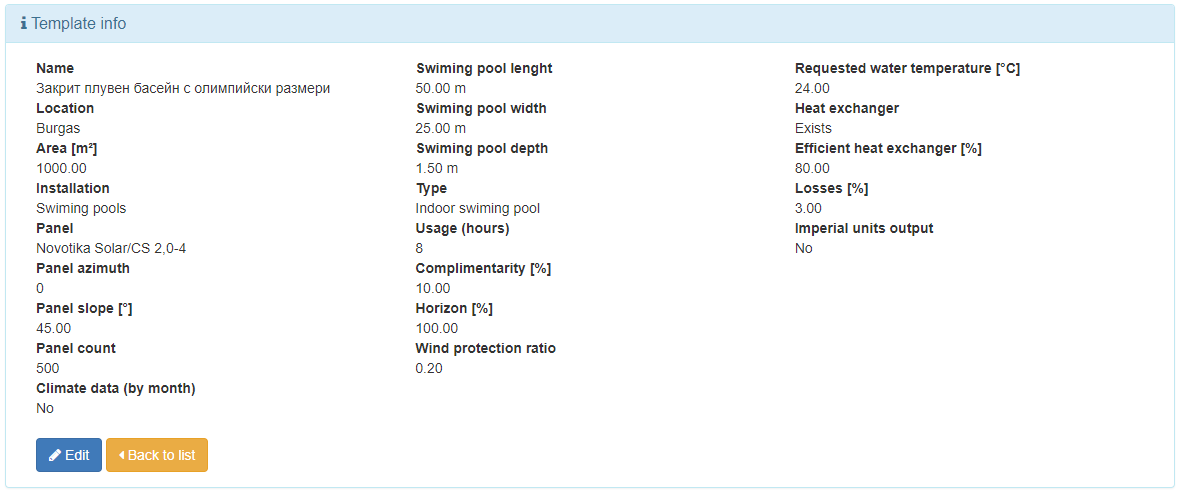
To get the decision information, click the second of the buttons in the "Action" column in the line of the selected template.

A window will appear, listing the characteristics of the selected template:
To search for a solution, enter the name or part of the template name and click the "Search" button. A list of templates matching the search will show.

You have the option to edit the solution (Edit button, if applicable) or return to the list (Back to list button)
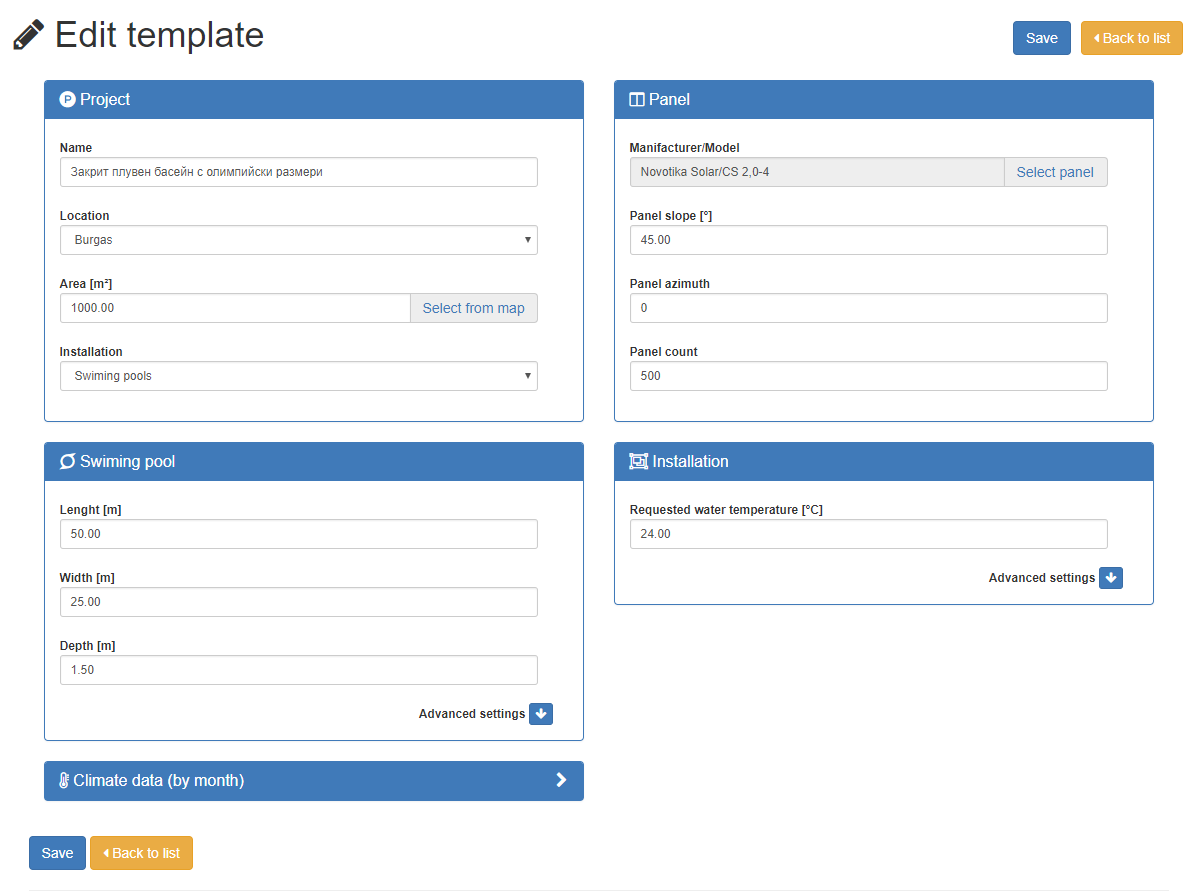
Click the "Edit" button in the "Action" column in the row of the selected template.

An edit form opens, where you can change the features of the template. When finished, click on the "Save" button. You can cancel the changes using the "Back to list" button
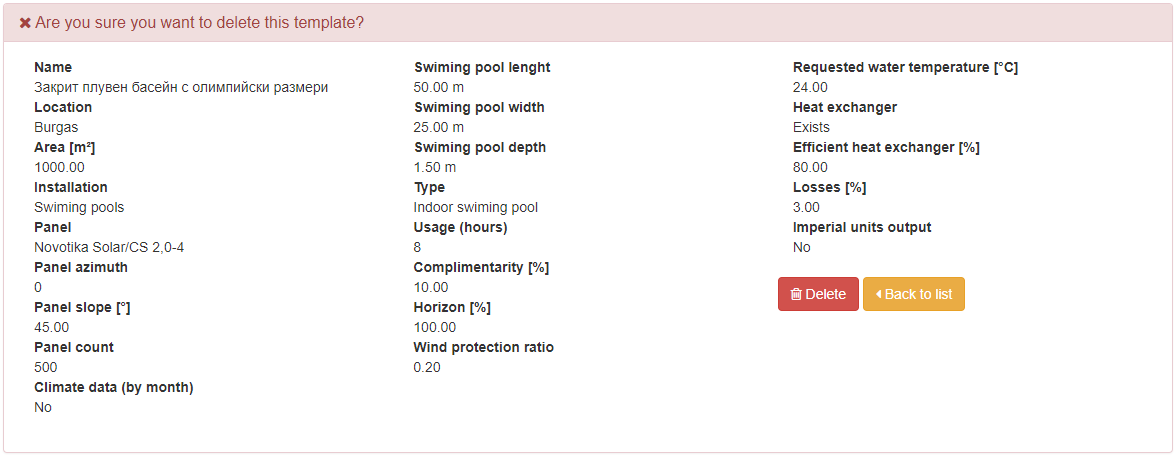
To delete the solution, click the "Delete" button in the "Action" column in the row of the selected template.

A form opens in which you can look at the features of the template. If you really want to delete it, click on the "Delete" button. If you cancel, click the "Back to list" button.
Pressing the "Calculate" button displays a calculation report for the current project saved as a template.

By selecting the , a table is displayed where you can choose a desired city from a drop-down menu and only companies from the selected city will be filtered out as a reference.

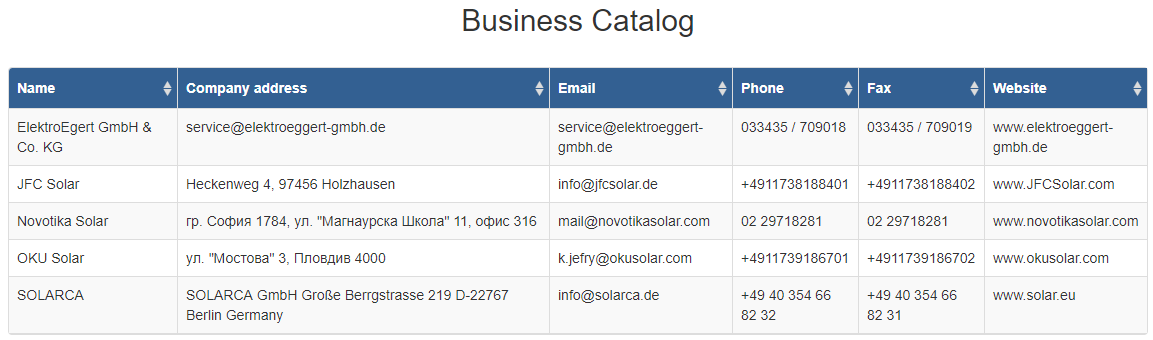
The business catalog shows all available companies entered into the system.
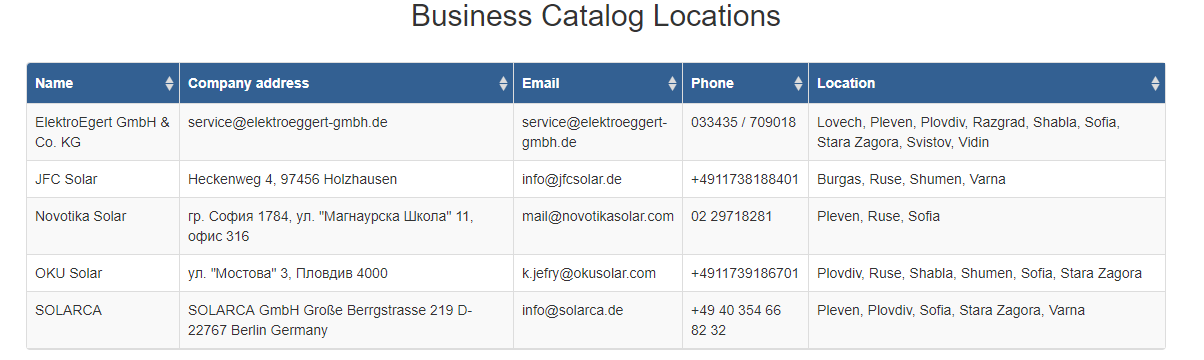
The business location catalog displays all available companies entered into the system, along with the locations where they are active.
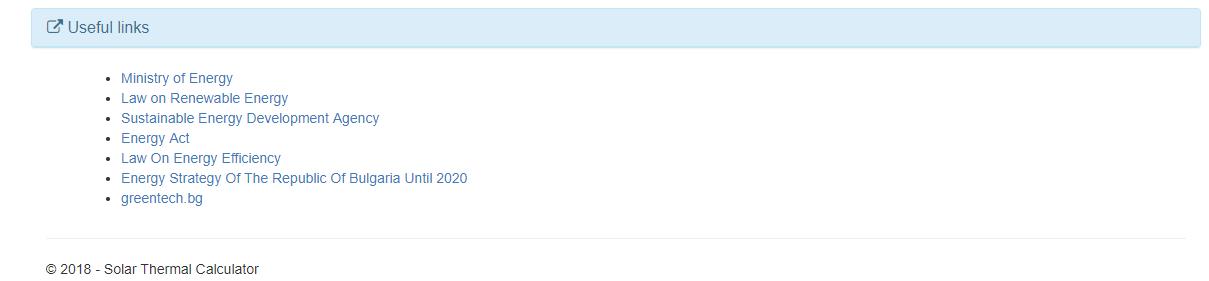
Useful links is a page where you can find links to important websites and legal regulations related to energy.
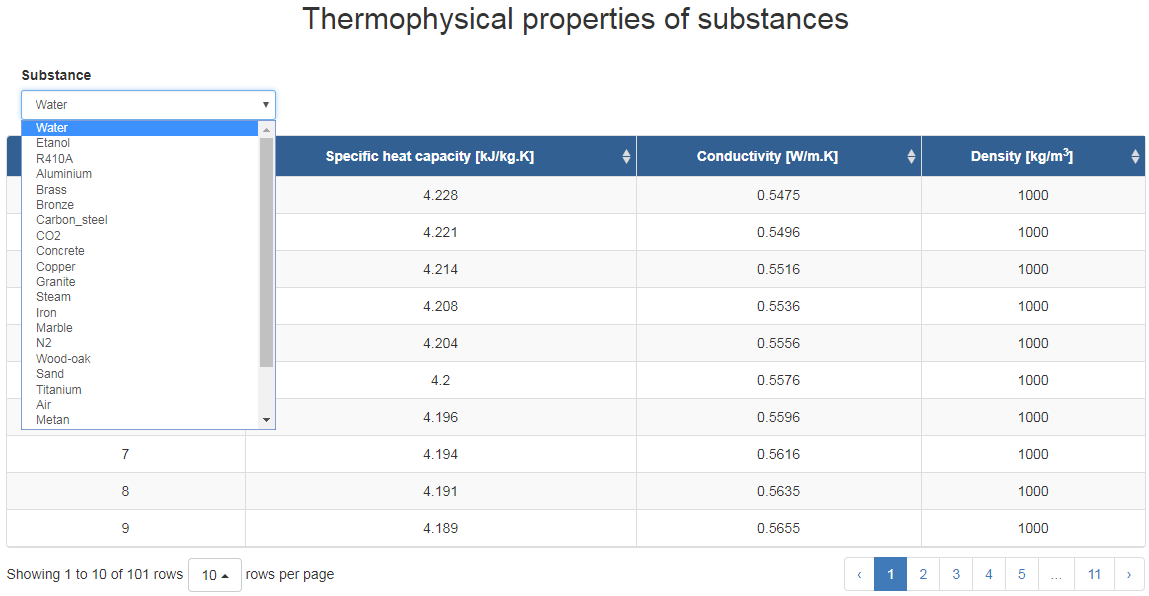
The site offers a database that contains the thermophysical properties of different substances at a temperature of 0 to 100 degrees. The database can be viewed by selecting the Database from the References menu:
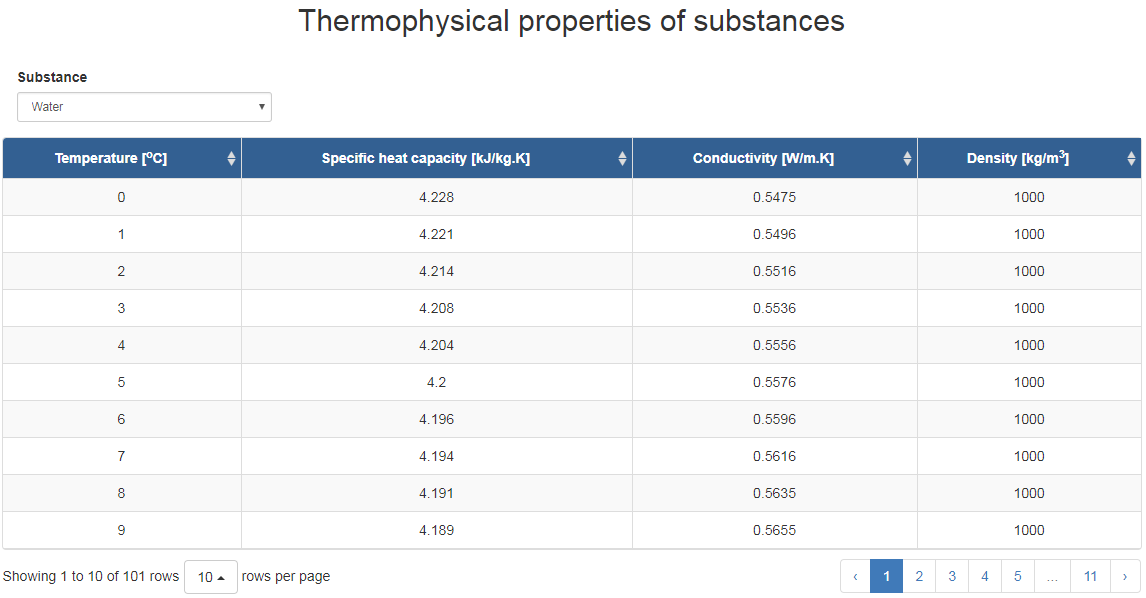
The list with the names of available substantions from database, appears from drop-down button "Substantions":
The "Information" menu offers a news page that shows new publications related to the energy field, a link to the site's help system, and information about its creators.
Solar Thermal Calculator
Manufacturer: Темпус-2000 ООД
Serial number: SDP–2614–3916–STSE
Version: 2.1.0.0
Date: 11/29/2022 12:40:50 PM